VIVE Ultimate Tracker now supports SteamVR-compatible headsets, unlocking a new dimension of precise, multi-point tracking across different devices. Here’s a step-by-step guide to get you started:
Step 1: Connecting the VIVE Wireless Dongle
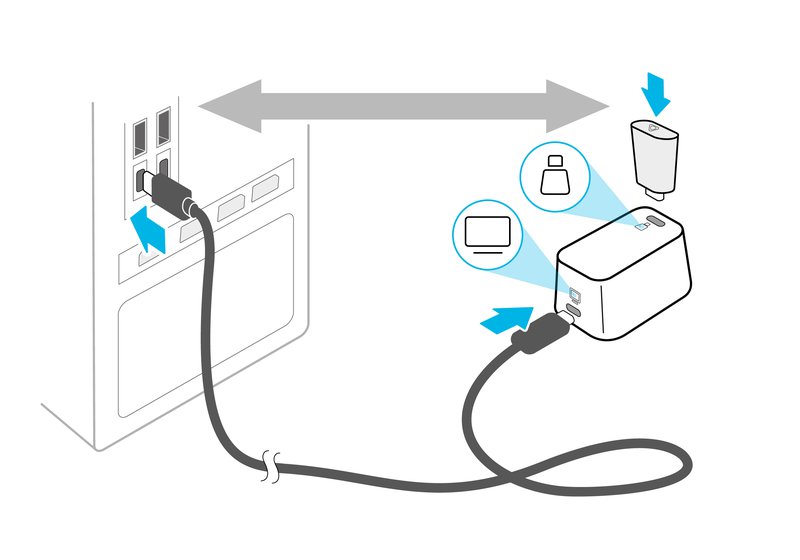
- Plugging in: Plug the VIVE Wireless Dongle into its dedicated USB port on the dongle cradle. Use the provided USB Type-C cable to connect the dongle cradle to a USB-C port on your computer.
- Placement Tip: Keep the VIVE Wireless Dongle at least 45 cm (18 inches) away from your computer in a stable location to avoid interference.

Step 2: Pairing VIVE Ultimate Tracker with the Dongle
- Install VIVE Hub, and ensure you’ve installed VIVE Ultimate Tracker within the VIVE Hub services.
- Launch VIVE Hub: Open VIVE Hub on your computer and navigate to Settings.
- Initiate Pairing:
- In the Trackers tab, select Pair new.
- Power on the VIVE Ultimate Tracker by pressing the power button. Then, press and hold for two seconds to activate pairing mode (indicated by a flashing blue LED).
- Check Connection: Once paired, you’ll see a tracker icon appear. You can pair up to five trackers.
Step 3: Creating a Tracking Map for Your Play Area
- Setup: Go to Settings in VIVE Hub, click VIVE Ultimate Tracker on the left panel, then click Start setup in the Trackers tab.
- Map Creation:
- Select Create tracking map.
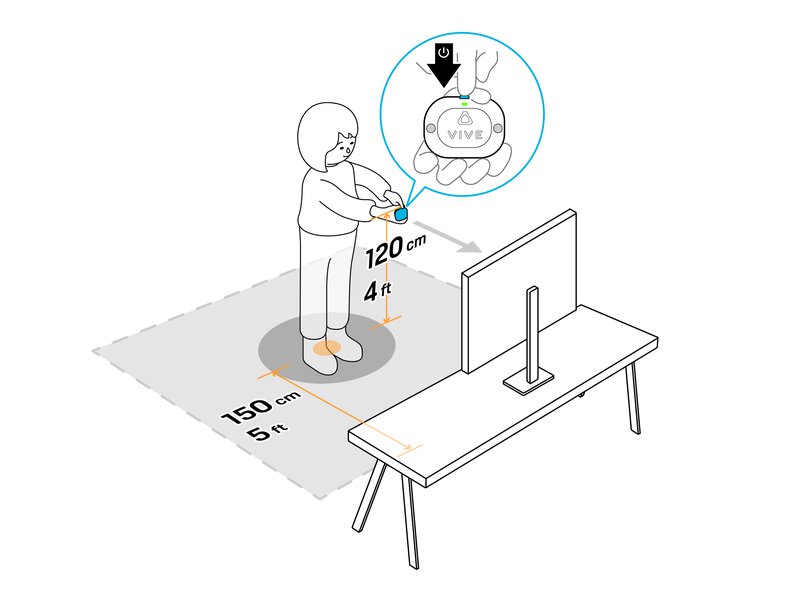
- Pick up the tracker whose LED is flashing green and press the power button.
- Hold the tracker approximately 120 cm (4 feet) from the ground, facing the computer screen. Slowly back up to around 150 cm (5 feet) and press the tracker’s power button.
- Complete a full scan from various angles around your play area.
- Refinement (Optional): If certain areas need refinement, repeat the scan until you achieve optimal tracking coverage.

Step 4: Calibrating VIVE Ultimate Tracker in VR
Note: For Meta Quest users, first ensure you’ve installed the Meta Quest Link PC app.
- Open SteamVR: Connect your headset to the computer, turn it and its controllers on, and open SteamVR. Ensure your headset, controllers, and trackers are detected in SteamVR.
- Put on the headset.
- Press the menu button on the controller to open the SteamVR dashboard.
- Select VIVE Space Calibrator: Within SteamVR, choose the controller you want to use to calibrate the tracker.
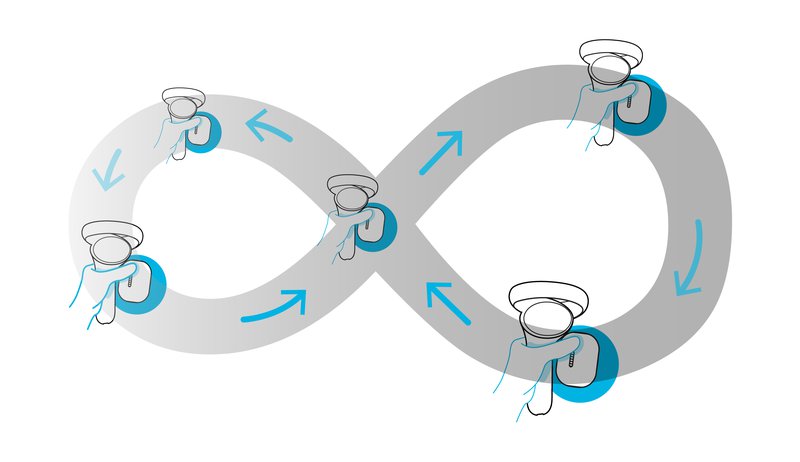
- Calibration: Hold both the controller and tracker in one hand and trace a slow, steady infinity symbol until the calibration is complete.
Important: When holding the controller and tracker, make sure you're holding the controller you chose to conduct the calibration, and ensure that the tracker's cameras are facing outwards.

Step 5: Power Frequency and Auto-Sleep Settings
- Set Power Frequency: In VIVE Hub, under Advanced, choose the power frequency appropriate for your region.
- Enable Auto-Sleep: Enable auto-sleep to preserve battery life by setting the tracker to sleep after three minutes of inactivity.
And that’s it! After following these steps, your VIVE Ultimate Tracker will be ready to enhance your VR experience with third-party SteamVR-compatible headsets. For more detailed instructions with videos, please visit our Support website.


